
“Your branches passed over the sea, reached to the Sea of Jazer:” Jeremiah 48:32
OK, when I had made the decision ahead of time to try something new and post a crochet pattern for a mermaid costume along with the Word of the Day, I was really sweating how I could make it all connect!
LOL! Only my God! I tell ya!
I think there were more mentions of the word “sea” in this reading than any of the others in the entire book of Jeremiah! Sure, it’s a bit of a stretch, but hey, it still fits right? (wink) Ya gotta love me!
I’ve heard it said that God’s love is like an ocean in that it’s farther than we could ever swim and deeper than we could ever dive. Well, if that’s true, then turn me into a mermaid baby ’cause I’m livin’ there! (By the way, at this point, We’ve been traveling, I’ve been working on this pattern ALL DAY LONG, and it’s after 1 am and I’m quite punchy. J
So without further ado I bring you my very first published crochet pattern!
 Ariel Costume
Girls sizes 6-7
Materials:
Hooks: I, N, & P
Yarn: Red Heart Super Saver Pale Green, worsted weight 4, Caron Simply Soft Blue Mint worsted weight 4, Red Heart Super Saver Lilac Worsted Weight 4, & small amounts of bright red worsted weight 4, white worsted weight 4 & dark purple worsted weight 4.
Abbreviations:
sl st = Slip Stitch
sc = single crochet stitch
hdc = half double crochet stitch
dc = double crochet stitch
tc = triple crochet stitch
qc = quadruple crochet stitch
ch = chain
dcf = double crochet foundation stitch
scf = single crochet foundation stitch
yo = yarn over (wrap your yarn over your hook from back to front)
Notes: Throughout the pattern, the last chain (ch) 2 space counts as a Double Crochet (DC)
At the end of each row the pattern calls for you to “turn” the material. You don’t have to do this, I actually didn’t. Instead I crocheted “in the round”, which means to just continue going in the original direction. You can do this with pieces that are crocheted in a circle like most of this one. Turn, no turn, I leave the decision completely up to you.
Tail:
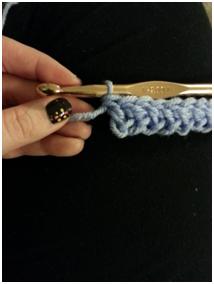
Row 1: With the N hook and Pale Green yarn you’re going to dcf (50), join with a sl st to create a circle, ch 2 & turn.
[To do a dcf:
ch 4
Yo and insert your hook into your first ch.
Yo, but pinch the yarn between your left thumb and forefinger in order to keep it loose. (this will be IMPORTANT later.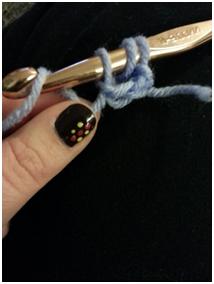
Pull the yo through the first loop only. It should look like this: I’m still pinching that same spot for reference.
Yo and pull through the first TWO loops on the hook, then it should like this: 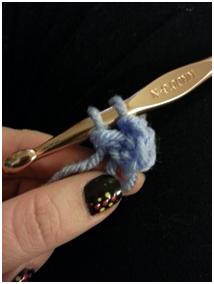
Yo and pull through the last two loops on the hook, then it should look like this:

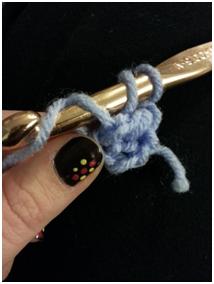
* Ok, here’s where that part you’ve been pinching comes in. yo and insert the hook into the pinched loop, your hook should look like this:

** Yo and pull through that pinched loop on the hook. When you yo again, pinch the slack as you pull through the next two (this is your new “pinched loop”), yo and pull through the last two on the hook.
Continue this step (from * to **) until you’ve reached the desired length of dcf. J]
Rows 2-14-: dc in each dc around, sl st in the original ch to close up the circle. Then Ch 2 & turn. (50 total stitches)
Row 15:
[creating the skirt split] dc in each of the next 25 dc. Then ch 2 & turn.
Row 16: Skip first dc and dc in the second dc from the previous row. (This creates a decrease of one stitch.) Then dc across however do not dc in the final chain stitch as this also creates a decrease of one stitch leaving you with a total of (48) stitches.
Rows 17-23: Repeat Row 16 continuing to decrease by 2 dc each row until you get down to 4 dc in Row 23. Finish off by ch 1, pull the yarn tight, trim yarn from ball and pull through the knot creating a tail.
Creating the second side of the skirt split:
Return to Row 15: Pull a loop up through dc #26 (right where you left off on Row 15 previously). Dc in each remaining dc across, working any tails between the previous rows and your new work. Then ch 2 & turn.
Repeat the same process from Rows 16-23.
Frill on the tail split:
Row 1: Using the N hook and the Blue Mint yarn, start at the point of one of the skirt splits and pull up a loop. Sc all the way around the rim of the skirt “hem”. (Sc over the tails of the yarn as you go.) Then ch 3 & turn.
Row 2: Using the P hook work 3 tc in each sc around. Join with a sl st. Finish off and weave in the tails.
Frill at waist:
Row 1: With the N hook again use the Blue mint yarn to draw up a loop in the ch stitch of the dcf row. Sc in each stitch across (50 total). Then ch 1 & turn.
Row 2: Work 3 sc in the first sc.
3 hdc in each of the next 2 sc.
3 dc in each of the next 2 sc.
3 tc in each of the next 3 sc.
3 qc in each of the next 6 sc.
3 tc in each of the next 3 sc.
3 dc in each of the next 2 sc.
3 hdc in each of the next 2 sc.
3 sc in each of the next 2 sc.
Sl st in the next 1 sc.
3 sc in each of the next 2 sc.
3 hdc in each of the next 2 sc.
3 dc in each of the next 2 sc.
3 tc in each of the next 3 sc.
3 qc in each of the next 6 sc.
3 tc in each of the next 3 sc.
2 dc in each of the next 2 sc.
3 hdc in each of the next 2 sc.
Join with sl st and finish off weaving in the tails. Then wipe the sweat from your brow!!! Woo! (If you find that my numbers are off on this, I wouldn’t be surprised! Just let me know so that I can fix them!)
Belt:
Ch a length of about 3 feet long. Finish off. And weave between the bars of the dcf row of the tail leaving the ends INSIDE so that the adjustable waist band is hidden.

Top #1:
Row 1: Using the N hook and the Lilac yarn, dcf 57 stitches and finish off.
Row 2: Draw a loop up and dc in the 20th dc of Row 1. 1 dc in each dc across to the 37th dc of Row 1. Then ch 2 & turn. (17 total dc centered on top of your 57 dcf.)
Row 3: 1 dc in each dc across. Then ch 2 & turn. (17 stitches)
Row 4: Skip 1st dc. 1 dc in 2nd dc from chain. 1 dc in each dc across. Skip last ch stitch. (Just like in the tail decrease.) Then ch 2 & turn. (15 stitches)
Row 5: Repeat Row 4, omitting the (ch 2 & turn). Finish off.
Flip piece over and repeat Rows 2-5 on the other side. Working in the underside of the dcf row make sure to put your hook under two strings each time.
Switching to the dark purple accent yarn, sl st between the bars all the way across the 2nd, 4th & 7th rows (Listed from top to bottom when looking at the piece as a whole.). Finish off after each row.
Then sl st around the entire outside edge of the piece covering over any tails as you go. I skipped the “strings” of the bikini but you don’t have to if you don’t want to. Finish off and weave in the tail.
Take a small length of lilac yarn (~6 in) and weave it from top to bottom through the center of the piece starting between the 7th & 8th dc on the top row and down through the rest of the piece. Fold the piece like you would a paper fan creasing each row individually and use the string to tie it up. Leave moderately loose for adjustment.
Bikini middle:
Using the I hook and the dark purple accent yarn scf a piece ~4 in long. Finish off. Tie around the middle of the Bikini top, covering the lilac yarn you wove through previously.
[A scf is worked exactly like a dcf except in the beginning you only chain 3, not 4. And you don’t yo before you insert your hook through the pinched loop.]
Top #2 (Pictured on model): Because my daughter refused to wear Top #1. I was a lot glad {Hallelujah for modesty!} … and a little mad, I HAD just spent about two hours making it.
Row 1: Using the N hook and the lilac yarn dcf 45 stitches. Join with a sl st into a circle. Then ch 2 & turn.
Rows 2-5: dc across, join with a sl st, ch 2 & turn. In Row 5, omit ch 2 & turn, and finish off instead.
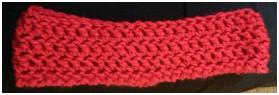 Headband:
Row 1: Using the I hook and the bright red yarn dcf 40 stitches. Join with a sl st into a circle. Then ch 2 & turn.
Rows 2-4: dc in each dc across. Join with a sl st. Then ch 2 & turn. In Row 4, omit ch 2 & turn, and finish off instead, weaving in the tail.
For the flower I’m sending you to someone else’s flower because I just don’t like mine. Anna was happy with it, but I wasn’t! If you REALLY like mine and want the directions, let me know and I’ll be more than happy to send them to you. J
Attach the flower to the headband and voila! You’ve made an Ariel costume!!! And some little girl will be very very happy you did!
* Thank you ever so much to Lucy from Attic 24 for the use of your wonderful flower tutorial! J


